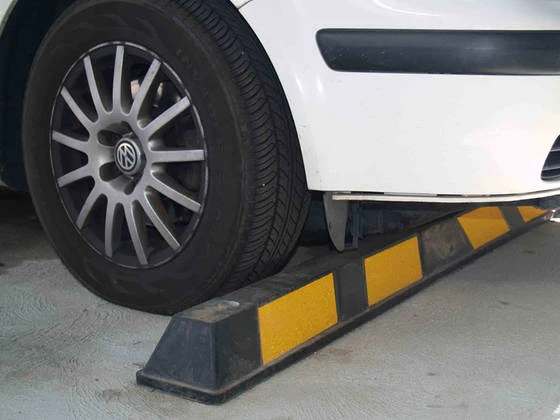
You’ve just pulled into a parking lot, tires perfectly aligned, when you notice it: a wheel stop, slightly askew, doing more harm than good—scraping bumpers instead of protecting them. It’s a subtle reminder that installation matters.
Whether you’re a property owner sprucing up a lot, a homeowner taming a tricky driveway, or a business manager enhancing safety, wheel stops—those trusty parking blocks or curb stops—are your allies. But here’s the million-dollar question: Should you grab a drill and tackle the job yourself, or call in the pros?
This article breaks down the DIY vs. professional debate with real-world insights, expert advice, and a step-by-step guide to help you decide—because a poorly placed wheel stop isn’t just an eyesore, it’s a liability.
Wheel Stops 101: Why Installation Counts
Wheel stops are low barriers (typically 6–8 inches high) designed to halt vehicles, preventing overreach into pedestrian zones, buildings, or other cars. Made from concrete, rubber, or plastic, their effectiveness hinges on proper placement and anchoring.
A 2023 report from the Parking Association found that 20% of wheel stop failures—shifting, cracking, or vehicle damage—stem from sloppy installation. Whether you go DIY or pro, getting it right ensures safety, durability, and peace of mind.
DIY Wheel Stop Installation: The Hands-On Approach
Rolling up your sleeves to install wheel stops can save cash and flex your problem-solving muscles. Here’s what you’re in for.
Pros of DIY Installation
- Cost Savings: Skip labor fees—often $50–$100 per hour—and you’re looking at $20–$60 per stop (material cost only). For a small lot of 10 stops, that’s a potential $500–$1,000 saved.
- Control and Flexibility: You set the pace and tweak placement on the fly. Last summer, I installed plastic wheel stops in my driveway, adjusting them inch-by-inch until they were perfect for my car’s clearance.
- Quick Start: No waiting for a contractor’s schedule. Buy, drill, and anchor—done in a weekend.
Cons of DIY Installation
- Skill Gap: Concrete stops (100–300 lbs) demand muscle or machinery like a forklift—tough solo. Rubber and plastic (15–40 lbs) are easier, but anchoring requires precision. Misjudge a drill hole, and your stop wobbles.
- Time Sink: A 2022 DIY survey by HomeAdvisor clocked average wheel stop installs at 4–6 hours for 5 stops—double that if you’re new to power tools.
- Risk Factor: Poorly secured stops can shift, creating trip hazards or vehicle damage. A friend of mine learned this the hard way when his DIY concrete stop cracked after a truck hit it—$200 down the drain.
Tools You’ll Need
- Drill with masonry bit (for concrete/rubber)
- Rebar spikes or lag bolts (anchoring)
- Level (for alignment)
- Measuring tape and chalk (marking spots)
Best DIY Candidate
DIY shines for small-scale projects—think home driveways or a few retail spaces—using lightweight rubber or plastic stops.
Professional Wheel Stop Installation: The Expert Edge
Hiring a contractor brings precision and experience, but it’s not without trade-offs. Let’s weigh the benefits against the costs.
Pros of Professional Installation
- Expertise: Pros know the tricks—like spacing stops 2–3 feet from curbs for clearance or angling them for drainage. “A professional install reduces long-term maintenance by 30%,” says Mark Daniels, a parking lot designer with 18 years in the field.
- Heavy Lifting: Concrete’s heft is no match for a crew with dollies or skid steers. A 2023 case study from a Texas warehouse showed pros installing 50 concrete stops in one day—DIY would’ve taken a week.
- Warranty: Many firms offer guarantees (1–5 years), covering shifts or cracks. Peace of mind? Priceless.
Cons of Professional Installation
- Higher Cost: Expect $100–$200 per stop, including labor and materials—steep for big lots. A 20-stop job could hit $2,000–$4,000.
- Scheduling Hassle: Booking a reliable crew can delay your timeline, especially in peak seasons.
- Less Control: You’re at the mercy of their vision—miscommunication can lead to misplaced stops.
What Pros Bring
- Specialized equipment (e.g., core drills, lifting gear)
- Compliance with local codes (e.g., ADA accessibility rules)
- Bulk efficiency for large installations
Best Pro Candidate
Professionals excel in high-traffic commercial lots, multi-level garages, or anywhere concrete dominates and precision is non-negotiable.
Real-World Showdowns: DIY vs. Pro in Action
- Case Study: Small Business Retrofit
- A café owner in Oregon opted for DIY rubber wheel stops in 2022—10 stops, $600 total, installed in a day. Result? Perfect alignment and zero complaints. Contrast that with a nearby gym that hired pros for 15 concrete stops ($2,500)—flawless, but the bill stung.
- Personal Tale: My Neighbor’s Misadventure
- My neighbor tried DIY concrete stops last year. Without a level, they tilted, and rainwater pooled—two cracked within months. A pro redo cost him $300 more than if he’d hired them upfront.
DIY vs. Pro: The Key Differences
- Cost: DIY keeps it cheap ($20–$60/stop) if you’ve got time and tools; pros charge a premium ($100–$200/stop) for expertise.
- Time: DIY takes hours to days, depending on scale; pros knock out big jobs fast but require scheduling.
- Durability: Pros anchor better, especially for concrete—DIY works if you nail the technique.
- Scale: DIY suits 1–10 stops; pros handle 20+ with ease.
Your Decision Guide: DIY or Pro?
Choosing between DIY and professional installation taps into your priorities—cost, control, or confidence. Here’s how to pick:
- Assess Your Project Size
- Under 10 stops? DIY is manageable.
- 20+ or heavy concrete? Call the pros.
- Gauge Your Skills
- Handy with a drill and level? DIY rubber or plastic is your lane.
- No construction experience? Pros mitigate rookie mistakes.
- Check Your Budget
- Tight funds? DIY cuts corners without cutting quality (if done right).
- Room to spend? Pros deliver lasting value.
- Consider Traffic and Stakes
- Low-traffic home lot? DIY’s low risk.
- Busy commercial space? Pros ensure safety and compliance.
- Test the Waters
- Unsure? Start with one DIY stop. If it’s a breeze, scale up. If it’s a headache, dial a contractor.
The Verdict
- Best for Budget and Small Jobs: DIY. You save big and learn a skill—ideal for rubber or plastic in personal spaces.
- Best for Scale and Precision: Professional. For concrete-heavy or high-stakes lots, their know-how pays off.
Final Thoughts: Install with Intent
Wheel stops aren’t just about parking—they’re about protection. DIY offers empowerment and savings, tapping into our love of mastery, while professionals deliver speed and certainty, easing the worry of “what if.” A 2021 Urban Institute study showed well-installed wheel stops cut parking mishaps by 25%—proof that execution trumps intent every time.


Sign in to leave a comment.