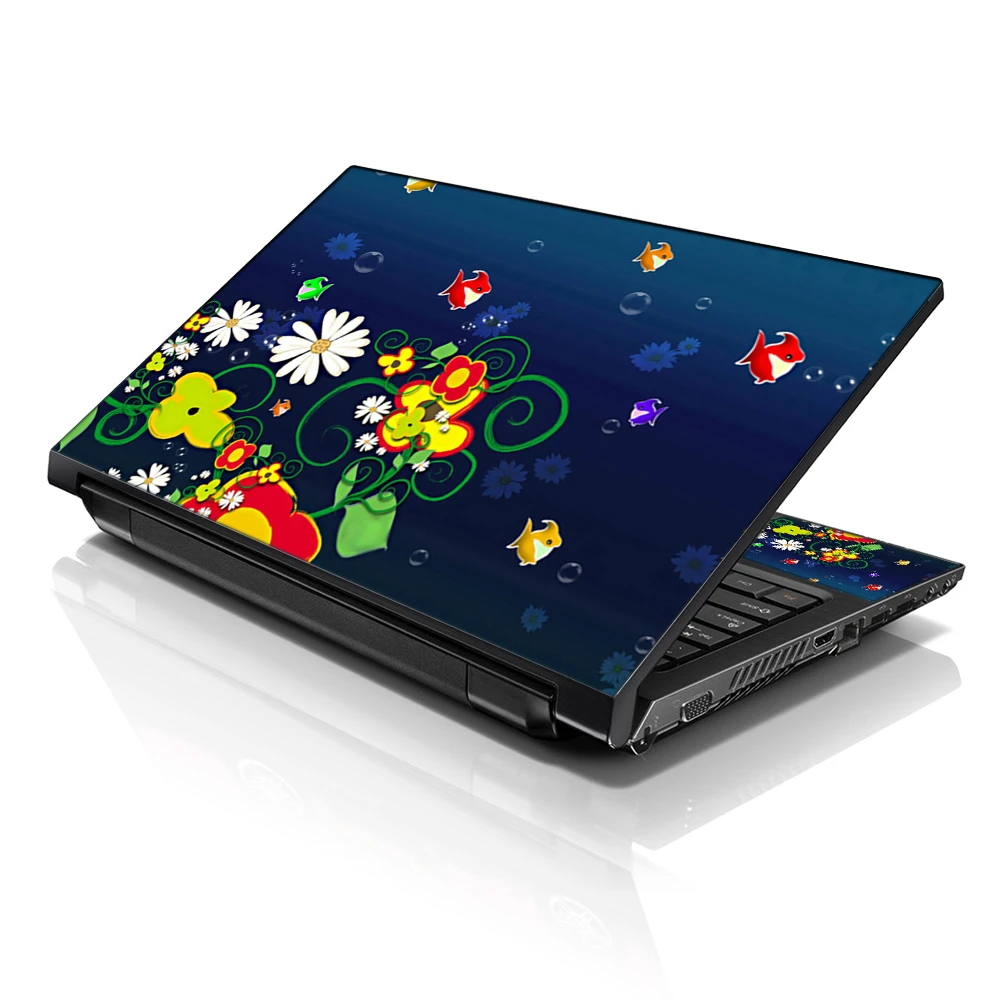
Personalizing your laptop skins with photos or artwork is a fantastic way to add a touch of individuality and creativity to your device. Whether you want to showcase your favorite memories, express your artistic side, or promote your brand, custom laptop skins allow you to transform your laptop into a unique canvas. This comprehensive guide will explore the step-by-step process of creating and applying a personalized laptop skin with photos or artwork.
Choosing the Right Images
The first step in personalizing your laptop skin is selecting the images you want to use. Whether it's photographs, digital artwork, or graphic designs, choose high-resolution images that reflect your personality, interests, or brand identity. Consider the overall theme or aesthetic you want to achieve and select pictures that align with your vision.
If you're using photographs, ensure they are clear, well-lit, and high-quality to achieve the best results. Choose files with a resolution of at least 300 DPI (dots per inch) for artwork or graphic designs to ensure sharpness and clarity when printed. It's also essential to consider the dimensions of your laptop and the areas you want to cover with the images to ensure they fit correctly without distortion or cropping.
Editing and Enhancing Images
Once you've chosen your images, you may need to edit and enhance them to achieve the desired look. Use photo editing software such as Adobe Photoshop or GIMP to crop, resize, adjust colors, and apply filters as needed. Experiment with different effects and adjustments to create a cohesive and visually appealing design.
If you're using multiple images or creating a collage, consider how they will blend and complement each other. Arrange the photos in a way that tells a story or conveys a message, whether it's highlighting your favorite moments, showcasing your artistic style, or promoting your brand. Feel free to get creative and experiment with different layouts and compositions until you find the perfect combination.
Customizing the Design
Once you're satisfied with the images, it's time to customize the design of your laptop skin. You can add text, logos, graphics, or other elements to personalize the design and make it yours uniquely. Consider incorporating your name, initials, or favorite quotes to add a personal touch to the skin.
Experiment with different fonts, colors, and styles to find the perfect balance between aesthetics and readability. Remember the overall look and feel you want to achieve and ensure that the added elements complement the images rather than overpowering them. Customizing the design allows you to create a laptop skin that reflects your personality, interests, and style preferences.
Choosing a Reliable Printing Service
Once you've finalized the design, it's time to print your custom laptop skin. Choose a reliable printing service specializing in custom laptop skins and offering high-quality printing options. Look for a service that uses premium materials and advanced printing techniques to ensure vibrant colors, sharp details, and long-lasting durability.
Before placing your order, review the printing specifications and requirements to ensure your design meets the necessary criteria. Consider file format, resolution, and color profile to ensure optimal printing results. Some printing services may also offer design assistance or proofing options to help you fine-tune your design before printing.
Preparing Your Laptop Surface
Properly cleaning and preparing your laptop's surface is essential before applying the custom skin on laptop. Use a gentle cleaning solution and a soft cloth to remove dust, dirt, or residue from the surface. Ensure the computer is completely dry before proceeding to prevent moisture from affecting the adhesive.
If your laptop has any existing stickers or decals, remove them carefully to create a smooth and clean surface for the new skin. Any rough or uneven areas on the laptop surface can affect the skin's adhesion and result in a less-than-ideal application. Take your time to thoroughly clean and prepare the laptop surface to ensure the best possible results.
Applying the Custom Laptop Skin
Once the laptop surface is clean and dry, it's time to apply the custom laptop skin. Carefully peel the backing off the skin and align it with the laptop's edges, ensuring it's positioned correctly before pressing it onto the surface. Use a squeegee or credit card to smooth out air bubbles and ensure a tight, secure fit.
During the application process, take your time to avoid wrinkles, creases, or misalignment. Start from one edge and gradually work across the surface, smoothing out the skin as you go. Please pay attention to corners and edges to ensure they correctly adhere to the laptop surface.
Trimming and Finishing Touches
Once the laptop skin is applied, use a sharp utility knife or scissors to trim any excess material along the laptop's edges. Take care to make clean, precise cuts to achieve a professional-looking finish. Trim any openings for ports, vents, or logos to ensure they remain accessible and unobstructed.
After trimming, take a final look at the laptop skin to ensure everything is aligned correctly and there are no visible defects or imperfections. Smooth out any remaining air bubbles or wrinkles and adjust to achieve the desired look. Once satisfied with the result, your custom laptop skin is ready to be enjoyed.
Caring for Your Custom Laptop Skin
Proper care is essential to keeping your custom laptop skin looking its best. Avoid using abrasive cleaners or harsh chemicals that may damage the skin or cause colors to fade. Instead, use a soft, damp cloth to wipe away dirt or smudges gently.
If the laptop's skin gets dirty or stained, gently wash it with mild soap and water and allow it to air dry completely before reapplying it to the computer. Avoid excessive rubbing or scrubbing, which may damage the printed design or adhesive backing. With proper care and maintenance, your custom laptop skin can stay vibrant and
Removing and Replacing the Laptop Skin
If you remove or replace the laptop skin, gently peel it off the surface, starting from one edge and working your way across. Take your time to avoid damaging the laptop surface or leaving any residue behind. If there are any stubborn adhesive residues, you can use a mild adhesive remover or rubbing alcohol to clean the surface.
Once the laptop skin is removed, you can discard it or save it for future use. If you plan to replace it with a new skin, repeat the cleaning and preparation process outlined earlier before applying it. Alternatively, you can enjoy the bare laptop surface or choose a different customization option, such as a different design or color.
Showcasing Your Style
Customizing your laptop skin with photos or artwork is a fantastic way to showcase your style and creativity. Whether you're a photographer looking to display your best work, an artist sharing your original creations, or a business owner promoting your brand, a custom laptop skin allows you to make a statement and stand out.
With endless possibilities for customization, you can create a laptop skin that reflects your unique personality, interests, and passions. Whether you prefer bold and vibrant designs or subtle and minimalist aesthetics, there's a custom laptop skin option to suit your style. Embrace your creativity and make your laptop genuinely one-of-a-kind with a personalized skin that speaks to who you are and what you love.
Showcasing Your Brand or Business
For business owners and entrepreneurs, custom laptop skins offer a unique opportunity to showcase your brand and promote your business. Incorporate your logo, company colors, and branding elements into the design to create a professional and cohesive look. Whether attending meetings, networking events, or working remotely, your custom laptop skin acts as a mobile billboard, raising awareness for your brand wherever you go.
Custom laptop skins also make excellent promotional giveaways or corporate gifts for clients, employees, or partners. By offering branded laptop skins, you reinforce brand loyalty and provide a practical and stylish accessory that recipients can use and appreciate. Whether you want to increase brand visibility, strengthen brand recognition, or add a personal touch to your business assets, custom laptop skins are a versatile and effective marketing tool.
Embracing Creativity and Individuality
Personalizing your laptop skin with photos or artwork is about embracing creativity and expressing your individuality. Whether you're a student, professional, artist, or hobbyist, your laptop is an extension of your personality and identity. Customizing it allows you to make it your own and reflect your unique tastes, interests, and passions.
Be bold, think outside the box, and push the boundaries of traditional design norms. Experiment with different styles, colors, and concepts to create a laptop skin that resonates with you on a personal level. Whether commemorating special memories, showcasing your artistic talent, or making a bold statement, your custom skins for laptops is a canvas for self-expression and creativity.
In conclusion, personalizing your laptop skin with photos or artwork is a fun, creative, and meaningful way to make your laptop uniquely yours. Choosing the right images, customizing the design, and applying the skin with care allows you to create a stunning and personalized accessory that reflects your personality, interests, and style. Whether you're looking to add a personal touch to your laptop, promote your brand, or showcase your creativity, custom laptop skins offer endless possibilities for customization and self-expression. So go ahead, unleash your imagination, and transform your laptop into a masterpiece with a custom skin that speaks volumes about who you are.


Sign in to leave a comment.