When it comes to creating a stunning entertainment experience at home, XTEN-AV ensures that every design and setup looks as good as it performs. A clutter-free installation not only enhances your viewing pleasure but also brings a professional touch to your entertainment space. Whether you are setting up your first projector or upgrading your system, proper wiring is essential to achieve both functionality and beauty. This is where planning your wiring layout makes all the difference in your Home Theater Projector Setup.
Introduction
Nothing ruins the ambiance of a home theater faster than tangled wires dangling from the ceiling or snaking along the floor. While the image quality and sound play major roles in your viewing experience, how you manage cables determines the overall aesthetic of your setup. Proper wiring keeps your space neat, improves safety, and ensures better signal performance.
This blog will guide you through the best methods to wire your home theater projector for clean aesthetics while maintaining accessibility for future upgrades.
Step 1: Plan Before You Begin
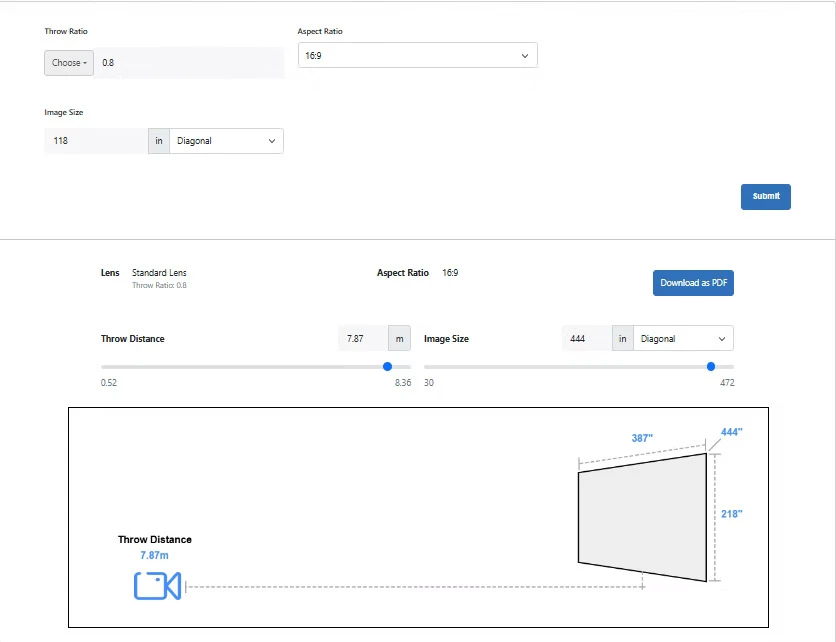
The first step to achieving clean wiring is proper planning. Before drilling holes or running cables, visualize your entire layout. Identify the location of your projector, screen, receiver, and power outlets. Consider whether your projector will be ceiling-mounted or placed on a shelf.
A clear plan ensures minimal cable length, which helps reduce clutter and signal degradation. Using a layout design tool or AV software can help you map out the entire system efficiently, ensuring you do not overlook important connections.
Step 2: Choose the Right Cables
Using the right cables is vital for maintaining performance and aesthetics. HDMI is the most common connection type for projectors, offering both audio and video signals. However, depending on the distance between your devices, you may need different cable types:
- Standard HDMI: Suitable for short runs up to 10 feet.
- High-Speed HDMI: Ideal for 4K projectors and longer distances up to 25 feet.
- Optical HDMI or HDBaseT: Perfect for long-distance connections, maintaining high quality without interference.
Label each cable before installation to make troubleshooting easier later. Investing in cable sleeves or braided HDMI cords adds a professional finish to the setup.
Step 3: Conceal the Cables
One of the most noticeable aspects of a clean setup is hidden cables. There are several ways to achieve this depending on your room design:
- In-wall Wiring: For a seamless look, run HDMI and power cables through the wall. This requires cutting small openings and using wall plates for clean termination.
- Cable Raceways: If you prefer not to open walls, raceways offer a simpler alternative. These plastic channels adhere to the wall and can be painted to match your room decor.
- Ceiling Conduits: For ceiling-mounted projectors, flexible conduits can guide cables from the projector to the wall neatly.
When running cables inside walls, ensure you use in-wall-rated cables (CL2 or CL3) to comply with safety standards.
Step 4: Power Management
Projectors require a reliable power source. Rather than trailing an extension cord across the room, consider installing a power outlet near the projector’s mounting point. This not only looks cleaner but also prevents voltage drops.
Using a power conditioner or surge protector protects your equipment from unexpected power surges. Hide the power strip behind furniture or within a media cabinet for a tidy appearance.
Step 5: Manage Excess Cable Length
Too much slack can make even the neatest setup look messy. Use cable management clips, Velcro straps, or zip ties to secure excess length. Coil cables neatly and keep power and signal lines separate to prevent interference.
If your projector is ceiling-mounted, bundle the cables together using a cable sleeve to create a single clean line running to the wall or receiver. This helps maintain a minimalist aesthetic.
Step 6: Integrate Smart Cable Management Accessories
Several accessories can elevate the look of your setup:
- Cable boxes: Perfect for concealing power strips and adapters.
- Cord covers: Ideal for floor-level cable management, especially if the projector is on a shelf.
- Decorative panels: Some setups use wooden or fabric panels to hide wires while blending with the room design.
These tools not only enhance the visual appeal but also keep the wiring accessible for maintenance or upgrades.
Step 7: Optimize Connectivity Through Your Receiver
Your AV receiver acts as the central hub for all connections. Instead of running multiple cables directly to the projector, route everything through the receiver. This reduces visible wiring and makes the system easier to manage.
Modern receivers often support wireless audio and video streaming, reducing the number of physical connections even further.
Step 8: Consider Wireless Options
For those who want minimal wiring, wireless projectors and HDMI transmitters are an excellent alternative. While wired connections remain superior for consistency and quality, wireless systems can reduce visual clutter and make installation faster.
Some high-end models even allow wireless power delivery through special mounts, offering an entirely cable-free ceiling installation.
Step 9: Test Before Finalizing
Before sealing walls or closing raceways, test all connections. Check for image quality, sound clarity, and stable power delivery. This step helps avoid having to redo the setup later, saving time and effort.
It is also important to confirm that your cable runs do not introduce signal lag or flickering, especially in high-resolution home theater systems.
Step 10: Maintain Regularly
Even the best wiring setup can degrade over time. Dust accumulation, cable bending, and repeated unplugging can affect performance. Schedule occasional maintenance to inspect and clean connections, ensuring your setup continues to look and perform perfectly.
Keeping your system updated with new cables and technology can also improve performance over time, especially as resolutions and data rates increase.
Conclusion
A beautifully wired home theater setup reflects both technical skill and aesthetic sense. When your cables are concealed, your connections organized, and your power sources planned efficiently, the result is a clean, immersive environment designed for pure enjoyment.
With XTEN-AV, you can design and visualize every connection in your Home Theater Projector Setup before you even begin installation. It ensures that your setup is not only visually stunning but also functionally sound.
In the end, wiring your projector properly is about more than just tidiness—it’s about creating a space where technology enhances comfort, not disrupts it. A well-planned wiring layout transforms your room into a true cinematic escape, ready for countless nights of movie magic.


Sign in to leave a comment.