Privacy on a personal PC begins with knowing what runs in the background and how to control it. On some Windows 11 builds and eligible devices, Windows Recall can capture snapshots of activity to provide a searchable timeline. If you prefer not to keep this feature, CL Debloat streamlines the process by offering a simple toggle that disables Recall and allows you to reverse the change later.
This guide explains how to use CL Debloat on Windows 11 Home, how to verify that Recall is off, and how to keep your system tidy without breaking everyday tasks. CL Debloat’s Knowledge Base confirms a dedicated item for disabling Recall and shows that the change is reversible.
What Windows Recall does and why Home users care
Windows Recall captures periodic screenshots and uses on-device indexing so you can search for what you saw or did earlier. This can feel convenient, yet it also raises reasonable privacy concerns for Home users who share PCs or handle sensitive information. If your PC does not include Recall, no action is needed. If it does, you can turn it off with Windows settings or policy, and you can use CL Debloat to make the change faster and repeatable. Mainstream how-to resources show the native switches in Settings, while policy-based methods exist for more permanent control.
Why use CL Debloat for Windows 11 Home
Windows 11 Home does not include the Group Policy Editor by default. That limitation matters because many articles describe disabling Recall through a policy named “Allow Recall to be enabled.” On Home edition, the equivalent control is a registry value that mirrors that policy. CL Debloat packages these steps so you can apply or undo them without hand-editing the registry, which reduces risk for non-technical users. Reliable Windows guidance notes the registry approach for Home when policy is not available.
Before you begin
- Confirm your Windows version and whether Recall is present. If you do not see Recall or the “Recall and snapshots” settings page, your device may not include it.
- Close open work and consider creating a restore point as a general Windows safety best practice.
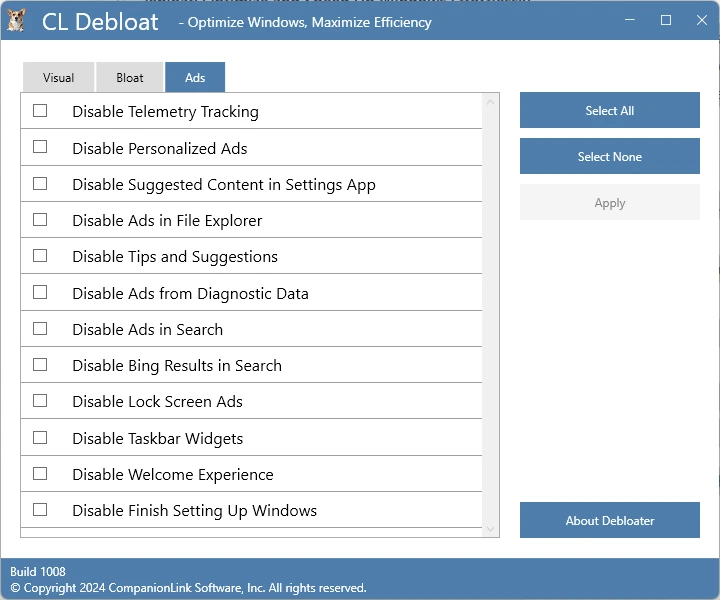
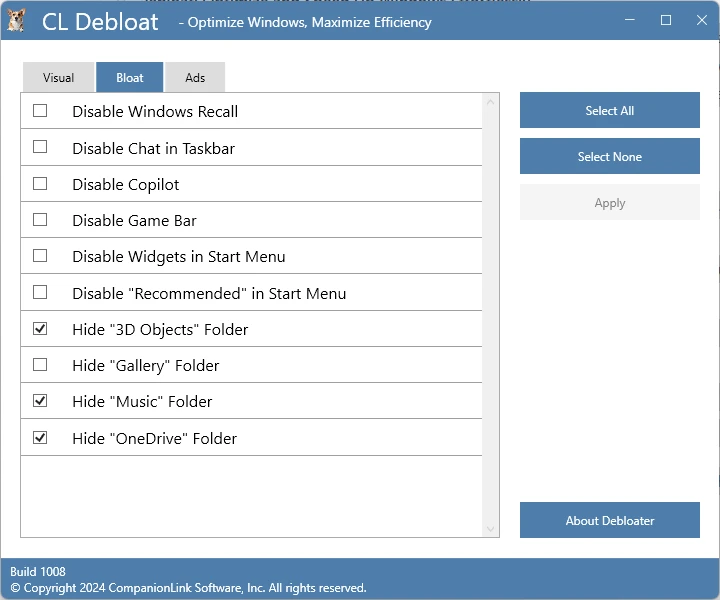
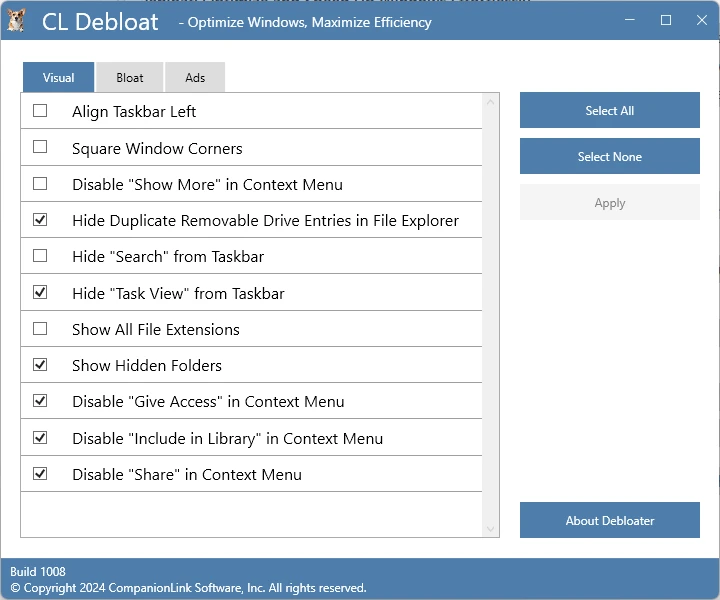
- Download and install the current CL Debloat build, which organizes its tools into Visual, Remove Bloat, and Remove Ads tabs. Recall controls appear under the bloat-removal area alongside other Windows features.
Step-by-step: Disable Windows Recall with CL Debloat
- Launch CL Debloat: Open CL Debloat with Administrator permission if prompted. The interface groups actions by tabs to keep related changes together.
- Open the Remove Bloat tab: Locate the item labeled “Disable Windows Recall.” This item is designed for systems where Recall is available. Selecting it applies the underlying registry and policy-aligned settings for Windows 11 Home.
- Apply the change and restart if requested: Click Apply. Some changes take effect immediately, although a restart may be recommended. After reboot, Windows will treat Recall as disabled at the system level.
- Verify in Windows Settings: Open Settings, choose Privacy and Security, then open “Recall and snapshots” if visible. The main Recall switch should be off, and the system should not capture new snapshots. Step-by-step references illustrate where these switches appear.
- Re-run CL Debloat later to keep it off: If a cumulative update re-enables a feature, reopen CL Debloat and reapply the toggle. The specific CL Debloat KB notes that items can be undone or restored through the same interface, which is helpful when testing or rolling back.
Alternative native methods you can use alongside CL Debloat
- Settings switch: On eligible devices, toggle Recall off in Settings. This is fast, although major updates might require you to confirm the choice again.
- Registry-based method for Home: On Windows 11 Home, you can achieve the effect of the policy by setting a registry value that disables Recall. This is precisely the gap CL Debloat fills for non-technical users. Trusted Windows coverage describes this approach for the Home edition.
These native paths are useful if you want to understand what CL Debloat automates for you.
How to keep Recall off after feature updates
Feature updates sometimes revisit privacy defaults. If your PC receives a large update, such as 24H2, and Recall appears again, repeat the disable steps in CL Debloat and recheck Settings. Third-party coverage has highlighted post-update checks as a best practice for keeping Recall off.
Safe rollback and audit trail
Change control matters. CL Debloat’s KB shows that you can undo the Recall toggle by unchecking it and applying changes. This supports troubleshooting and gives you an audit-friendly path to return to stock behavior if needed for support or warranty purposes.
Practical privacy checklist for Windows 11 Home
Disabling Recall is only one part of a tidy privacy setup. Consider the following additional items, many of which CL Debloat groups near the Recall control:
- Disable Chat and Widgets if you do not use them.
- Review Copilot visibility and background services.
- Remove advertising and suggestion surfaces such as lock screen tips or Start recommendations.
- Show file extensions and hidden items to reduce risky double-clicks.
CL Debloat’s layout makes these changes discoverable in one place, so you can apply them in a single pass.
Troubleshooting and common questions
1. I cannot find Recall in Settings:
Not every Windows 11 PC includes Recall. Some devices never receive it. If there is no Recall settings page, your device likely does not support the feature, and the CL Debloat toggle will have no visible effect on that specific item.
2. Does this break Windows updates?
Turning a feature off does not block updates. However, large updates may reset certain privacy defaults. Revisit CL Debloat after major updates to confirm that your choices remain in place. Guidance for Home shows registry-based methods that persist across reboots.
3. Can I re-enable Recall later?
Yes. CL Debloat’s KB outlines how to uncheck the Recall item and click Apply to restore the feature, which is helpful if you need it temporarily for a test.
Is Windows 11 Home supported?
Yes. The entire purpose of the registry-based approach is to give Home users an equivalent to Group Policy. CL Debloat automates that method so you do not edit keys manually.
Best practices for a clean, reversible setup
- Apply changes in small batches and document what you enable.
- Create a restore point before broad changes, especially on production machines.
- Keep CL Debloat installed while you evaluate so you can quickly undo individual toggles.
- Revisit your configuration monthly and after any large update.
These habits keep your machine predictable and reduce surprises.
Conclusion
You can disable Windows Recall on Windows 11 Home with confidence when you centralize the work in CL Debloat. The tool applies policy-aligned registry changes for Home, exposes a single toggle to keep Recall off, and offers a simple way to restore the feature if you change your mind.
Combine Recall control with a few adjacent privacy tweaks, and you will have a quieter, more focused desktop that respects your preferences. For Home users who want clear steps and reversible changes, CL Debloat provides a practical, low-friction path.


Sign in to leave a comment.